
Instructor: Tom Igoe
Play Tones
void setup() {
  Serial.begin(9600); // Initiate serial communication (for debugging)
}

void loop() {
  int analogValue = analogRead(A0); // Read Analog Value from A0

  // Mapping analog values from the 200-900 range to the 100-1000 range
  int frequency = map(analogValue, 0, 1023, 100, 1000);

  // Output the frequency from pin 9 to the speaker
  tone(9, frequency);

  // Serial output for debugging
  Serial.print("Analog Value: ");
  Serial.print(analogValue);
  Serial.print("  Frequency: ");
  Serial.println(frequency);

  delay(100); // Delays for stable behavior
}
A more complex example
#include "pitches.h"

// notes in the melody:
int melody[] = {
NOTE_C4, NOTE_G3,NOTE_G3, NOTE_GS3, NOTE_G3,0, NOTE_B3, NOTE_C4};

// note durations: 4 = quarter note, 8 = eighth note, etc.:
int noteDurations[] = {4,8,8,4,4,4,4,4 };

void setup() {
  // iterate over the notes of the melody:
  for (int thisNote = 0; thisNote < 8; thisNote++) {
    // to calculate the note duration, take one second
    // divided by the note type.
    //e.g. quarter note = 1000 / 4, eighth note = 1000/8, etc.
    int noteDuration = 1000/noteDurations[thisNote];
    tone(8, melody[thisNote],noteDuration);

    //pause for the note's duration plus 30 ms:
    delay(noteDuration +30);
  }
}

void loop() {
  // no need to repeat the melody.
}
A Musical Instrument
#include "pitches.h"

const int threshold = 10;      // minimum reading of the sensors that generates a note
const int speakerPin = 8;      // pin number for the speaker
const int noteDuration = 20;   // play notes for 20 ms

// notes to play, corresponding to the 3 sensors:
int notes[] = {
NOTE_A4, NOTE_B4, NOTE_B4 };

void setup() {
  Serial.print(9600);

}

void loop() {
  for (int thisSensor = 0; thisSensor < 3; thisSensor++) {
    // get a sensor reading:
    int sensorReading = analogRead(thisSensor);


    // if the sensor is pressed hard enough:
    if (sensorReading > threshold) {
      // play the note corresponding to this sensor:
      tone(speakerPin, notes[thisSensor], noteDuration);

    }

  }

}briefly introducing libraries
/*
 Controlling a servo position using a potentiometer (variable resistor)
 by Michal Rinott <http://people.interaction-ivrea.it/m.rinott>

 modified on 8 Nov 2013
 by Scott Fitzgerald
 http://www.arduino.cc/en/Tutorial/Knob
*/

#include <Servo.h>

Servo myservo;  // create Servo object to control a servo

int potpin = A0;  // analog pin used to connect the potentiometer
int val;    // variable to read the value from the analog pin

int sensorValue = 0;

void setup() {
  myservo.attach(9);  // attaches the servo on pin 9 to the Servo object
  Serial.begin(9600);
}

void loop() {
  sensorValue = analogRead(potpin);
  val = analogRead(potpin);            // reads the value of the potentiometer (value between 0 and 1023)
  val = map(val, 0, 1023, 0, 210);     // scale it for use with the servo (value between 0 and 180)
  myservo.write(val);


  Serial.print("sensor = ");
  Serial.println(sensorValue);
  Serial.println();
  Serial.print("motor value = ");
  Serial.println(val);
  delay(1000);                           // waits for the servo to get there
}
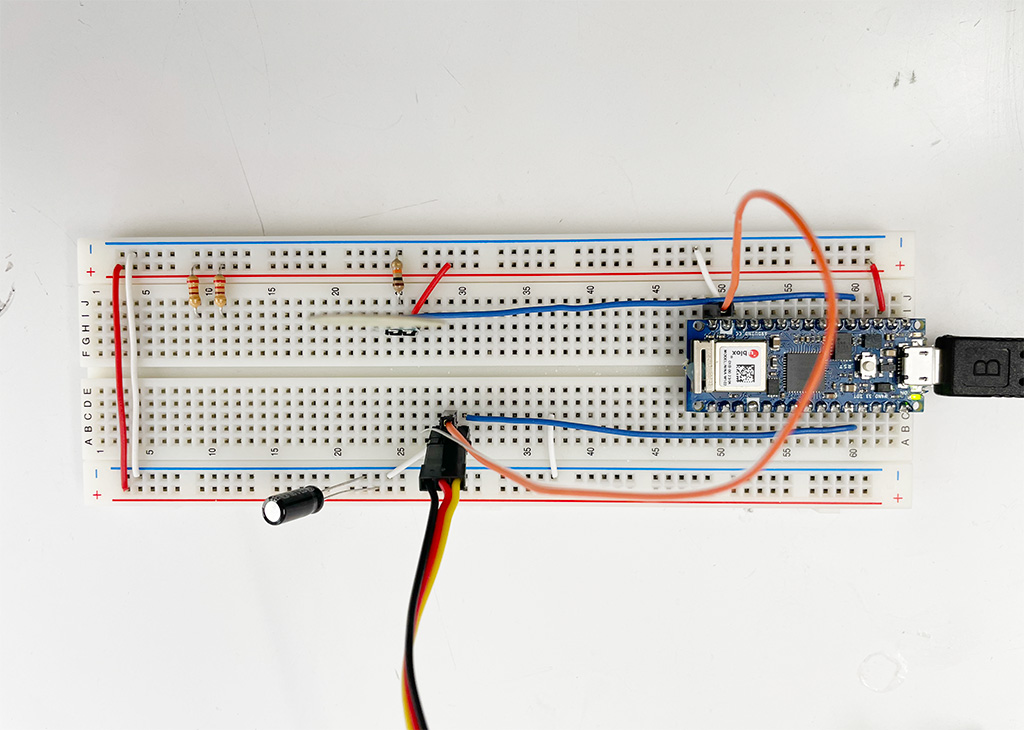
Made a circuit by connecting a servo motor to the analog input. It was used with a 10µF(microfarad) capacitor.
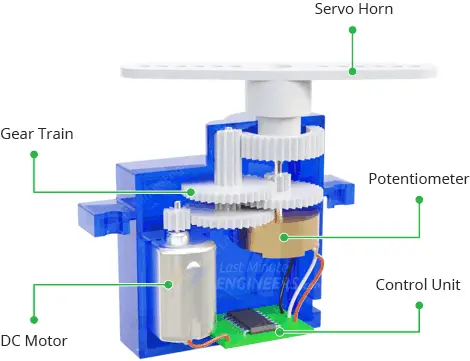
What is a Servo motor?
Question
- The servo motor has vibration when lifted by hand and less vibration when put down, why is that?
- In play tone, why doesn’t “
floatfrequency =map(sensorReading, 200, 900, 100, 1000);” work? It works after changing to “floatfrequency =map(sensorReading, 0, 1023, 100, 1000);“.