How it works?

The MAX30102 sensor measures heart rate using a method called photoplethysmography (PPG), which is based on optical principles. The sensor uses infrared, red, and green LEDs, along with a photodiode, to detect changes in blood flow under the skin. Here’s how it works:
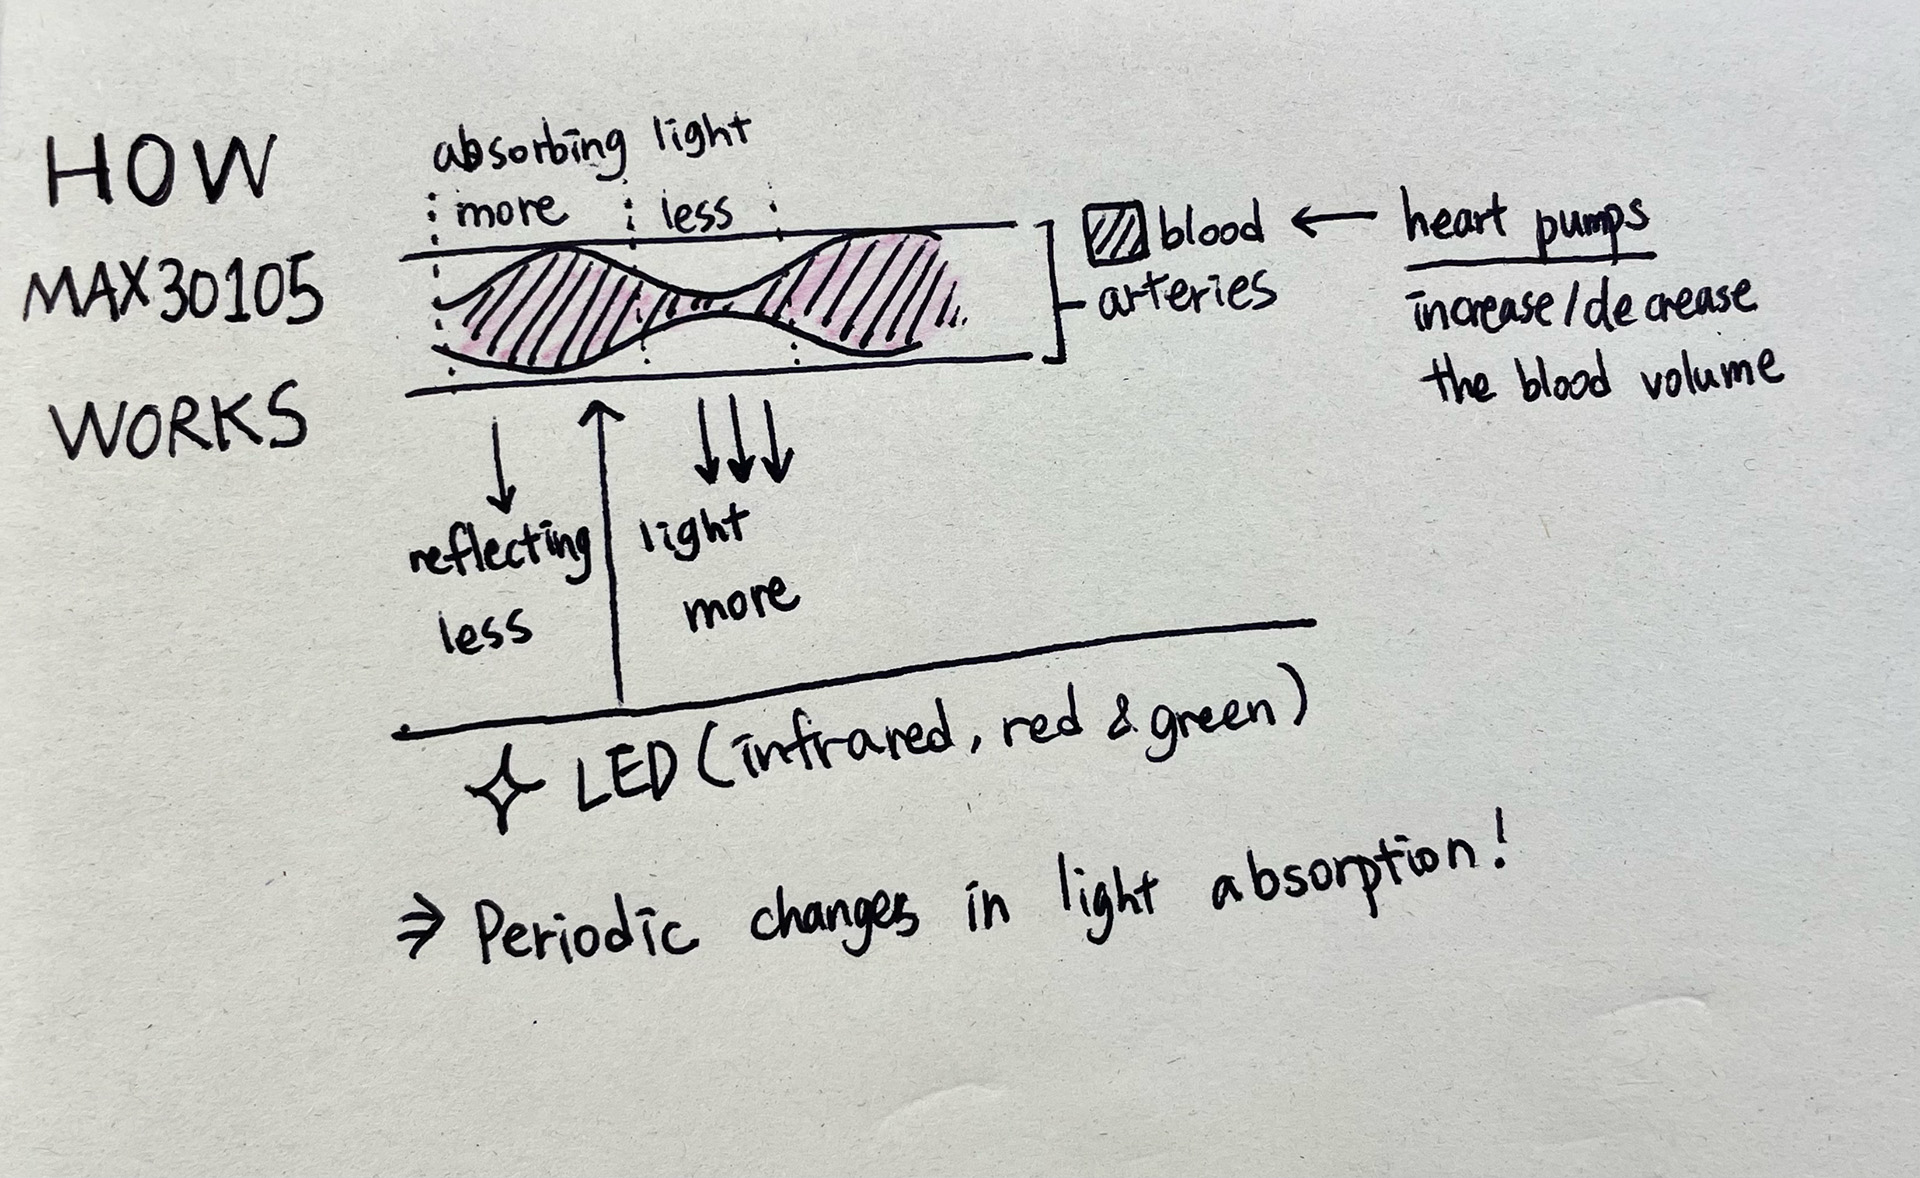
- Light absorption and reflection: The MAX30102 emits light from its LEDs (infrared, red, and green), which passes through the skin. Some of this light is absorbed by the blood, and the rest is reflected back. Blood absorbs more light than surrounding tissue.
- Detecting blood flow changes: As the heart beats, the volume of blood in the arteries changes. When the heart pumps, the blood volume increases, absorbing more light. Between heartbeats, the blood volume decreases, allowing more light to be reflected. These periodic changes in light absorption and reflection correspond to the heartbeat.
- Photodetector measurements: The photodiode in the MAX30102 detects the reflected light. The amount of reflected light fluctuates based on the volume of blood under the skin. These fluctuations are used to determine heart rate.
- Signal processing: The sensor amplifies and filters the signal to remove noise, making it possible to detect the periodic changes that correspond to each heartbeat.
Through this process, the MAX30102 sensor uses light to track changes in blood flow and calculates the heart rate from the detected signals.
https://lastminuteengineers.com/max30102-pulse-oximeter-heart-rate-sensor-arduino-tutorial
Example

https://app.arduino.cc/sketches/0c37b2ce-cccf-46a6-bd0a-14266f6f28b3?view-mode=preview
#include <Wire.h>
#include "MAX30105.h"
#include <Servo.h>

MAX30105 particleSensor;

// Servo servo1;
// Servo servo2;
Servo servo3;

void setup()
{
  Serial.begin(115200);
  Serial.println("Initializing...");

  // 센서 초기화
  if (!particleSensor.begin(Wire, I2C_SPEED_FAST))
  {
    Serial.println("MAX30105 was not found. Please check wiring/power.");
    while (1);
  }
  Serial.println("Place your index finger on the sensor with steady pressure.");

  particleSensor.setup(); // 센서 기본 설정
  particleSensor.setPulseAmplitudeRed(0x0A); // 빨간 LED 설정
  particleSensor.setPulseAmplitudeGreen(0);  // 녹색 LED 끄기

  // 서보 모터 초기화
  // servo1.attach(9); // 서보 모터 1 연결 (핀 3)
  // servo2.attach(8); // 서보 모터 2 연결 (핀 5)
  servo3.attach(7); // 서보 모터 3 연결 (핀 6)

  // 서보 모터 초기 위치 설정
  // servo1.write(90);
  // servo2.write(90);
  servo3.write(90);
}

void loop()
{
  int irValue = particleSensor.getIR();

  // irValue를 1000으로 나누어 스케일링
  int scaledIrValue = irValue / 1000;

  // 범위 결정
  // int range = 0; // 1: LOW, 2: MID, 3: HIGH

  // if (scaledIrValue >= 80 && scaledIrValue <= 90)
  //   range = 1; // LOW
  // else if (scaledIrValue >= 91 && scaledIrValue <= 100)
  //   range = 2; // MID
  // else if (scaledIrValue > 100)
  //   range = 3; // HIGH

      // 평균 심박수가 80을 넘으면 서보 모터 작동
      if (scaledIrValue > 80)
      {
        // 서보 모터를 180도로 이동
        servo3.write(180);
      }
      else
      {
        // 서보 모터를 90도로 복귀
        servo3.write(90);
      }

  // 해당 범위의 서보 모터 작동
  // if (range != 0)
  // {
  //   operateServo(range);
  //   delay(3000); // 3초 동안 대기 후 다음 값 수신
  // }

  // 디버깅을 위한 출력
  Serial.print("IR=");
  Serial.print(scaledIrValue);
  if (irValue < 50000)
    Serial.print(" No finger?");

  Serial.println();

  delay(100); // 시리얼 모니터 스팸 방지를 위한 짧은 딜레이
}

// void operateServo(int range)
// {
//   switch (range)
//   {
//     case 1: // LOW 범위
//       servo1.write(0);
//       delay(1000);
//       servo1.write(180);
//       delay(1000);
//       servo1.write(90);
//       break;
//     case 2: // MID 범위
//       servo2.write(0);
//       delay(1000);
//       servo2.write(180);
//       delay(1000);
//       servo2.write(90);
//       break;
//     case 3: // HIGH 범위
//       servo3.write(0);
//       delay(1000);
//       servo3.write(180);
//       delay(1000);
//       servo3.write(90);
//       break;
//     default:
//       // 범위에 해당하지 않는 경우 아무 것도 하지 않음
//       break;
//   }
//}
